


Suggested Taps3 conversion Instructions
Note: High Roller LLC. is not responsible for any damages or loss as a result of this installation guide.
Warning
-High Roller Wake LLC (HRW) is not liable for damages due to improper installation or misuse. Purchaser responsible for installation.
-HRW may affect the boat’s handling and may impact the turning radius of the boat when deployed.
-Never use HRW tabs at speeds over 15 mph, or when not wakesurfing.
-HRW use will vary with hull shape, ballast system. Always observe manufacturer’s ballast recommendations.
-Never install HRW on a boat that is not designed to wakesurf behind.
-USERS ASSUME ALL RISKS OF INSTALLING/USING THE HIGH ROLLER WAKE SURF TABS.
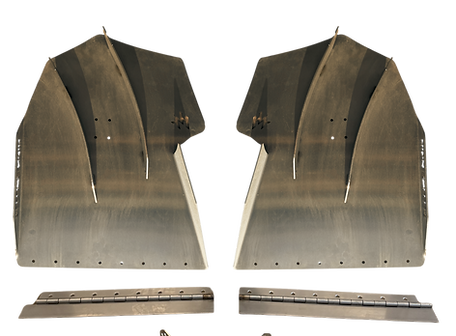
Required tools/supplies
https://www.highrollerwake.com/product-page/apex-wakesurf-tabs-hinges-for-tige-boats
3m 4200 or 5200 marine adhesive (quickdry recommended)
6 Lenco #14 self tapping stainless steel screws
Lenco upper actuator mount (optional)
3/16” drill bit (lenco actuator mount)
½” wrench/socket
7/16” Wrench/Socket
Angle finder ap or device
12v power supply or Tige touch2 or Clear in dealer demo mode (Dealer settings screen, 9191 to enter)
24 1/4"-20 stainless button head bolts and nylock nuts (5/8" length)
3-1/4" Long 3/8" bolt and locknut to attach actuator to lower mount.
Plastic busing spacers

1.Remove existing OEM plates and mounts
Carefully unscrew self tapping screws by hand. Inspect the hull for any water damage or delamination. If there's issues new holes may need to be drilled.
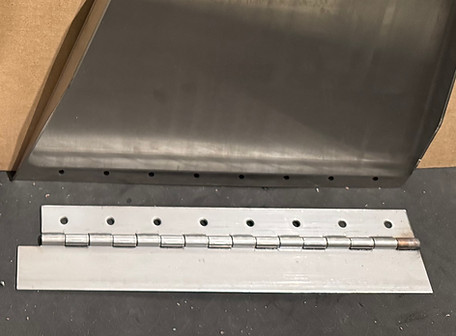
2. The new hinge
We now build and sell custom piano hinges for this install, these feature predrilled side matched to the tabs and a blank side to copy your hole pattern onto.

3. Copy hole pattern from original hull mount
Copy hole pattern from original hull side Tige tab mounting bracket onto the blank leaf of the piano hinge. Make sure to position holes to leave at least 1/8 inch of space from the boats bottom running edge to the bottom edge of the hinge. Use a sharp drill bit and go slow.

4. Mount new hinges on hull
Install new hinges into the existing holes on the transom using 3M quick dry 5200 and existing self tapping screws (or replace with new ones). Attach Highroller tab to hinge. Watch this video for reference before you start to mount your actuator tab: https://www.youtube.com/watch?v=wzNtDUj6CF8

5. Determining retraction
Connect your surf tab to the hinge and then your actuator to the upper mounting bracket and the lower bracket on the hinge. Using 12v power supply or your Tige clear screen in dealer demo mode make sure the actuator is in its fully retracted position. Place the upper actuator bracket against the boat and position it so that the tab is retracted as far up to your swim platform as possible without hitting it. Mark the location of the actuator bracket on your hull by tracing around it. It must be aligned square to the hinge and usually falls about ½ " above the top edge of the hinge. Record the retraction you achieve; you should aim for at least 14 degrees upwards of your hull level zero out so the diverter fin wont affect the surf side wave.

6. Determining deployment
Extend the actuator all the way using your tige surf demo mode found in dealer settings (access code is 9191) and check the tab angle relative to the hull level using an angle finder. Aim for 15 degrees of deployment below hull level zero out, anywhere from 10-15 is acceptable. Most Tige's surf best around 6-7 degrees of deployment below hull level. If you need more deployment move the mount lower on the transom and/or try different mounting holes on the tab. This part may take some trial and error to dial in.

7. Top Actuator mount install
Once you have tested the range in both directions using demo mode, trace around the outside of the mount bracket. We recommend using the lenco mounts (https://www.amazon.com/dp/B000BAZTZU?ref=ppx_yo2ov_dt_b_fed_asin_title if you don't have a non swivel mount already. Drill your mounting holes in the boat using the reverse-forward drill technique using a 3/16" drill bit for the Lenco self-tapping screws. The bottom of the bracket is typically between 1/8 - 1/2" above the top of the hinge. DO NOT DRILL THE CENTER HOLE for the lenco actuator wire, you can just feed more of it out from the original location so it will reach.

8. Test all surf settings
Using the dealer demo mode test the full cycle of surf positions and record the deployment angles relative to e to the hull to help with tuning later. Most times will surf best with around 5-7 degrees of deployment below the hull zero out level.

9. Test and tune
Get the clinometer ap and use that to help tune your boat. Most boats will need about 8.5-10 degrees of pitch (bow rise angle) and 3+ degrees of roll (list towards surf wave). If the wave is washy you likely have too little list, empty offside ballast in small increments or move additional weight to surf side. If wave is too short in length put more weight in the bow or adjust centre plate.
Note: There is no replacement for displacement. The more weight you can run the better - as long as it can safely be done.
Warning
-High Roller Wake LLC (HRW) is not liable for damages due to improper installation or misuse. Purchaser responsible for installation.
-HRW may affect the boat’s handling and may impact the turning radius of the boat when deployed.
-Never use HRW tabs at speeds over 15 mph, or when not wakesurfing.
-HRW use will vary with hull shape, ballast system. Always observe manufacturer’s ballast recommendations.
-Never install HRW on a boat that is not designed to wakesurf behind.
-USERS ASSUME ALL RISKS OF INSTALLING/USING THE HIGH ROLLER WAKE SURF TABS.